Quick Note
All of the conclusions below were based off of my individual findings dealing with Vue and my cable provider. But, I used some parts of pfSense that a lot of people talk about and I thought it would be good to put it on paper for others to find.
For all of the pfSense examples below I am using pfSense 2.4.0-BETA on an Netgate SG-1000.
The Issue
When the decision to cut the cord it was with much excitement about the upcoming experimenting with different content providers. Firs we tested hardware and ended up settling on the Amazon FireTV. Then we started a free trial of both Sling and Playstation Vue. While going back and forth between the two I started to notice an issue. Sling was streaming without issue while we kept getting queued up with Vue.
I began to investigate. At the time I was running the system wireless through a Ubquiti UniFi setup, through our pfSense firewall, and out of our cable connection (70 down, 4 up). I noticed that while streaming Slack the data flow looked steady. But, when Vue was streaming, there were constant spikes in upload and download utilization. This really got me thinking…why would we be seeing spikes in both directions with a streaming service?
I started investigating. After digging and digging I finally found a post (which I can no longer find the link to…) that shed some light onto the subject. It was a description of the mechanism used by the Vue app to proactively monitor the bandwidth available to stream. It basically said that the due app was running a small bandwidth test periodically to test the available bandwidth for streaming.
This got me thinking about my cable internet provider. I had often run into issues with my link quality becoming garbage anytime I hit the limit on 70 down & 4 up on our account. The policing the company used was vicious and would drop packets like mad.
The Quick Test
I believed these periodic bandwidth tests were causing my providers aggressive policing to kick in and trash my link. To test my hypothesis I decided to put two limiter rules on my firewall. One was named upload and one was name download. I set the upload bandwidth to 2 meg and the download bandwidth to 5 meg (since this is the advertised Vue usage). I then put a rule on the LAN interface of my pfSense to catch traffic from my FireTV and apply the limiter.
After setting up this quick test I cleared my current firewall states so all the flows would be caught by the new rules. We fired up a show on Vue and I watched the limiters. Everything was working as it should on the firewall. Also, the stream was solid and I was not seeing the traffic spikes we were seeing earlier. I was seeing some drops on the limiters, but they did not seem to be affecting the quality of the stream.
I decided to put this into a more sustainable configuration so that I could maintain it moving forward, and make it scalable as we added FireTVs in other rooms of the home.
The Long Term Solution
Since we were planning to add more FireTVs to the home I decided to:
- Create static DHCP reservations for the devices
- Create a host alias group in pfSense that contains all of the devices
- Create an upload and download limiter
- Create a rule a firewall rule on my LAN interface to catch traffic and apply the limiter.
1. Create Static DHCP Reservations
To be sure I grabbed the proper devices each time, and to prevent myself from having to configure static IPs on my devices, I decided to use static DHCP reservations. Luckily static IP reservations are very easy in pfSense. I went to Status > DHCP Leases and found my FireTV. I then select the white background plus sign:

This will take you to the “Static DHCP Mapping on LAN” page. Here you will fill out all the information required for your environment. The only requirement is IP Address. The rest of the fields will accept the default settings from your DHCP configuration.
2. Create a Host Alias Group in pfSense That Contains All of the Devices
Once the static DHCP reservation is complete we move on to creating the alias group. For this I went to Firewall > Aliases > IP and clicked the “+ Add” button at the bottom of the list. Luckily for us the aliases setup within pfSense is very straightforward! Enter a desired name & description. Then make sure “Host(s)” is selected in the “Type” dropdown. After this add your new static IP to the “IP or FQDN” field. If you have more devices to add to this group just click the “+ Add Host” button and add as many as you need!
3. Create an Upload and Download Limiter
Now that we have our devices statically addressed and in an alias group we move on to configuring the limiters. We will need one limiter for the upload side and one for the download side. You will see why in the creation of the rule to catch traffic.
To configure a limiter is pfSense go to Firewall > Traffic Shaper > Limiters and select “+ New Limiter”. Below I have a screenshot of my AmazonTV_Download Limiter:
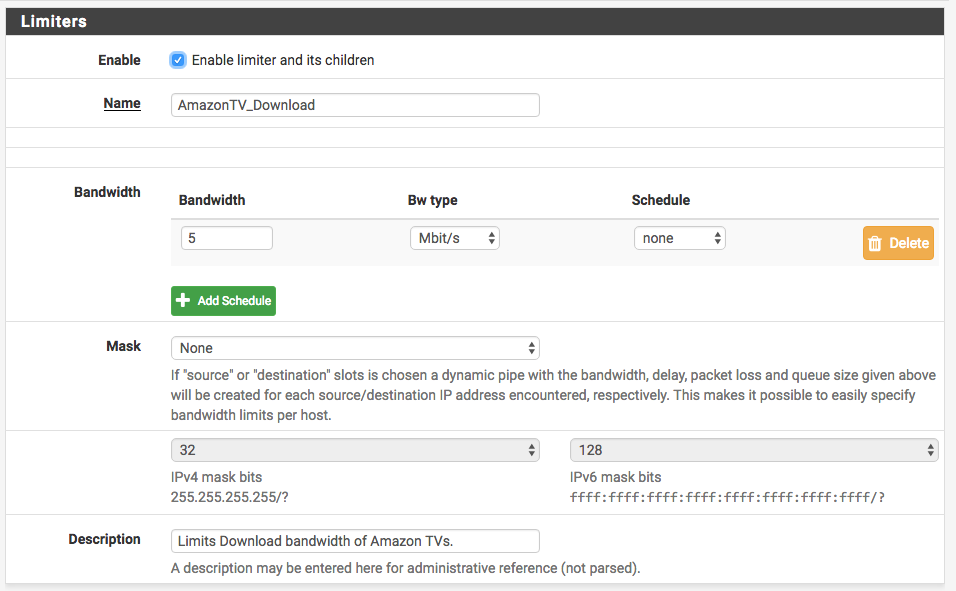
There are a lot of other fields available, but these are the basic ones that need to be filled out. I also created another limiter named AmazonTV_Upload. This one is set to 2 Mbit/s. I could probably lower that, since my FireTV shouldn’t be uploading anything to the Internet…
Once these are created be sure to save and apply your changes!
4. Create a Rule a Firewall Rule on My LAN Interface to Catch Traffic and Apply the Limiter.
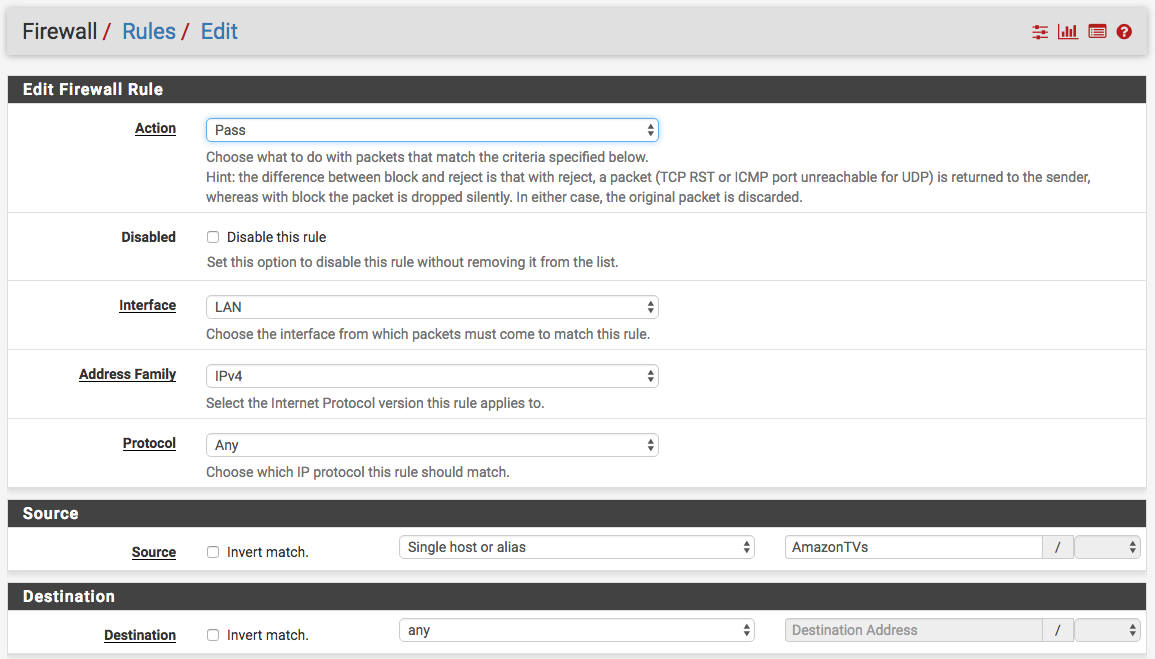
This is where the rubber hits the road! Once all of the other pieces are configured we are ready to create a firewall rule to apply the limiters to the traffic. To do this we go to Firewall > Rules > LAN (because all of my FireTV devices are on the LAN network).
Here we select the “Add” button with the arrow pointing up. This is chosen so that the new rule will catch the FireTV traffic before it hits any other rules on the LAN interface. Depending on your rule setup you may need this rule to be elsewhere. If you are using floating rules always be mindful of your order of operations within the firewall. Floating rules are processed first!
I have included a screenshot of my Amazon FireTV rule below. You will see that I am using the alias group as the source with any as the destination matching on any protocol. The limiter is configured under the advanced options, so you will need to click the “Display Advanced” button at the bottom of the rule. At the bottom of the Advanced section you will see “In / Out Pipe”. This is where we put our limiters to use!
I like to pretend I am standing on the firewall looking at the device. So, the “In” pipe is where you put your upload rule and the “Out” pipe is where you put your download rule. They have added some language to explain this in the section.

Once the rule is saved and applied all you need to do is power cycle your FireTV so it will pick up the new IP reservation and then everything should start working.
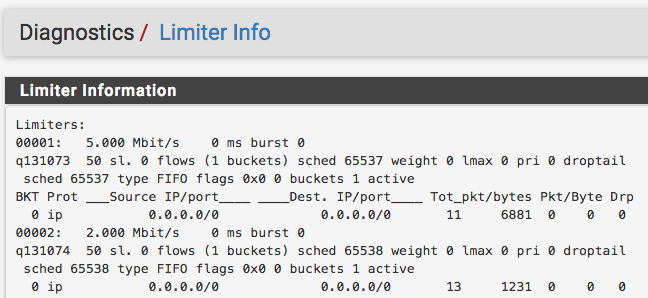
Monitoring
To monitor your limiters go to Diagnostics > Limiter Info. Here you will see the real time data pertaining to the usage of your configured limiters. I have included the output from mine below as an example:
Final Thoughts
This is just one way I have used limiters. They are a VERY powerful tool in the pfSense arsenal!
If there are any questions/feedback/corrections please feel free to reach out in the comments below!
4 comments
Roy Pitchford
Sunday, Mar 12, 2017
I have a very similar setup - but with 4 FireTV devices - 2 are FireTV and 2 are Sticks. I went through your directions and I still see some freezing, but it does seem better. The freezes are shorter in duration. One question I have is does the Limiter need to be adjusted since I have 4 devices or is the Limit applied per device?
Thanks, Roy
Dan
In reply to Roy Pitchford
Sunday, Mar 12, 2017
Roy,
The limiter will need to be adjusted. The limiter is shared by all devices that are being captured in your firewall rule. Therefor, if you are using 4 devices I would suggest increasing your limiter to 20 Mbit/s.
We only watch one TV at a time, so I have set my limiter at 5 Mbit/s since this is the per stream bandwidth according to Playstation Vue documentation. And Vue is the “hungriest” streaming app we use on the platform.
Thanks for reading and providing feedback! If you have any further questions feel free to ask.
Dan W.
JimM
Wednesday, May 10, 2017
Dan
In reply to JimM
Thursday, May 11, 2017
Say something
Thank you
Your post has been submitted and will be published once it has been approved.
OK